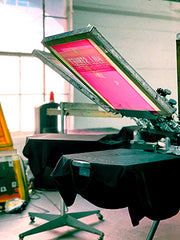
In this video we are doing a run of black t-shirts with a two color print using white and red plastisol ink. We printed the white base with two strokes, flashed the ink and printed white again with one stroke. Then we flashed again and printed red ink through a 230 mesh screen.
Tips for Screen Printing with Plastisol Ink
- Use as high mesh count as you can! Plastisol will go through high mesh screens.
- Don't force the ink into the shirt fabric. Plastisol is meant to sit on top of the fabric- Forcing ink into the shirt fabric actually makes plastisol muted. Use enough force when printing to clear the ink through the mesh and leave the ink on top of the fabric. If you see ink on your platens after printing your probably pressing to hard while printing.
- Watch your flash temp! To much heat on your inks while flashing is often mistaken as "the inks aren't flashed" because the ink is tacky. When ink is over flashed it also becomes tacky. So keep an eye on your flash unit.
- Use the correct squeegee for the correct inks. A softer squeegee (like a 60 durometer ) will help shear more ink through your mesh and onto your garments- and harder squeegee (like 75 durometer) will shear less ink off but helps keep the prints more crisp. (Often white ink is printed with a triple durometer squeegee because white ink is one of the thickest inks, making it harder to print manually. A triple durometer squeegee is usually something like 75/60/75 - with the 75's being the harder durometer to help keep the softer durometer from bending over while printing- and the softer middle durometer forces the maximum amount of white ink through the mesh. ) Another varible to squeee's is the printing angle and speed. The more angle you give your squeegee the less ink you will shear off onto the garment. The slower the print stroke and the more ink you will deposit on the garment.
- EOM. Emulsion over mesh- using more emulsion on your mesh provides a thicker stencil to deposit more ink- using less emulsion provided a thinner stencil that will help deposit less ink.
The correct and best way to print the design in the above video would be to print the white base (180 mesh), flash the base, and then print the red ink through a 230 mesh and then print a highlight white through a 230 mesh as well, the last two colors could of been printed wet on wet. When you use a under base white screen and highlight white screen you can save time by reducing a flash on each shirt. So 48 shirts would be 48 less flash cycles and the prints would be softer then using the under base screen (typically a 156 to 180 for white) and printing more layers on the ink.
Read next
Screen Printing on Polyester Performance Shirts
Discharge Screen Printing Tips
CMYK True Process
Screen Printing
Related Posts
Photoshop vs. Illustrator

T-shirt Photography
Leave a comment